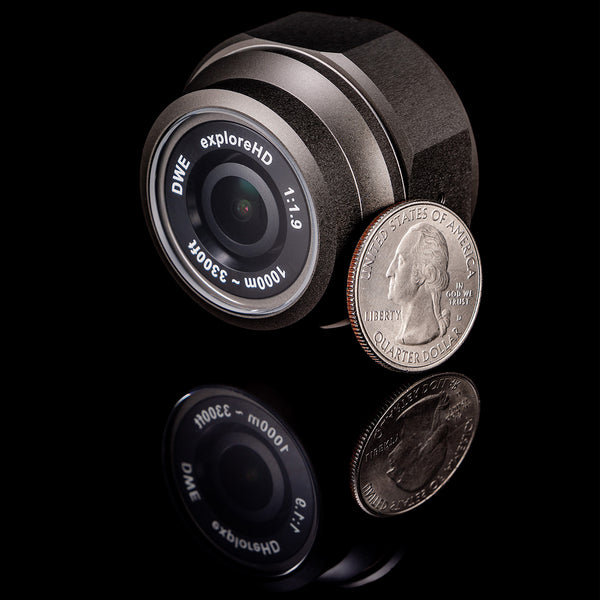
exploreHD Heavy#
Introduction#
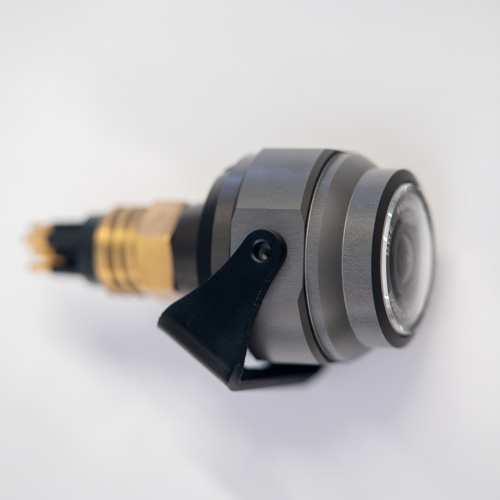
Introducing the exploreHD Heavy, a novel camera that builds on the principles exemplified by the original exploreHD. New to this model, this subsea USB camera features high definition USB output and a backlit Sony sensor with an even larger active area than the standard exploreHD, all housed in a novel enclosure rated to 1000m! Advanced automated exposure and white balance adjustments ensure accurate colors and a natural image, even in low light conditions.
The exploreHD Heavy also features H.264 compression technology, allowing up to 7 cameras to be connected and streamed simultaneously with minimal loss in quality and latency. This makes it the perfect choice for advanced multi-cam ROV/AUV setups, oceanography, and aquaculture. With the exploreHD Heavy, you can clearly and easily record in the most brutal underwater environments.
Technical Specifications#
Water-Resistance Specifications
Water-Resistance Depth: 1000 meters
Cable Diameter: 4.5mm OD
Cable Penetrator/Connector: - BlueRobotics Wetlink - Subconn MCBH8M - Additional options available upon request
Physical Specifications
Mass in Air: 120 grams
Mass in Water: 50 grams
Main Case: - Naval-grade aluminum, especially corrosion resistant - Dark grey abrasion-resistant hard anodized coating - Four M2 thread mounting locations corresponding to sensor plane cardinal points
Front Port: Scratch-resistant sapphire with internal AR coating
Camera Specifications
Image Sensor: 1/2.8” Sony Exmor™ STARVIS CMOS 12-bit
Resolution: 1920x1080
Framerate: 30fps with H.264/MJPEG
Format: H.264, MJPEG, YUY2
Chroma Subsampling: 4:2:2 with YUY2, 4:2:0 with MJPEG/H.264
Color Depth Per Channel: 8 bit per RGB channel / 24 bit per pixel
Bitrate: 10Mb/s with H.264, VBR with MJPEG/YUY2
H.264 Compression Profiles: Baseline Profile
USB Latency (MJPEG/H264): 33ms ± 3 USB Testing Tool
Streaming Latency: 34ms ± 5 More Details
Connection: USB2.0 High Speed
Voltage: 5V
Current: 250mA
Wattage: <1.5W
Resolutions and Framerates
MJPEG:
Resolutions:
1920x1080,1280x720,800x600,640x480,640x360,352x288,320x240@30fps,@25fps,@20fps,@15fps,@10fps,@5fps
H264:
Resolutions:
1920x1080,1280x720,800x600,640x480,640x360,352x288,320x240@30fps,@25fps,@20fps,@15fps,@10fps,@5fps
YUYV (4:2:2):
Resolutions:
1920x1080@5fps
Resolutions:
1280x720@10fps,@5fps
Resolutions:
800x600@15fps,@10fps,@5fps
Resolutions:
640x480,640x360,352x288,320x240@30fps,@25fps,@20fps,@15fps,@10fps,@5fps
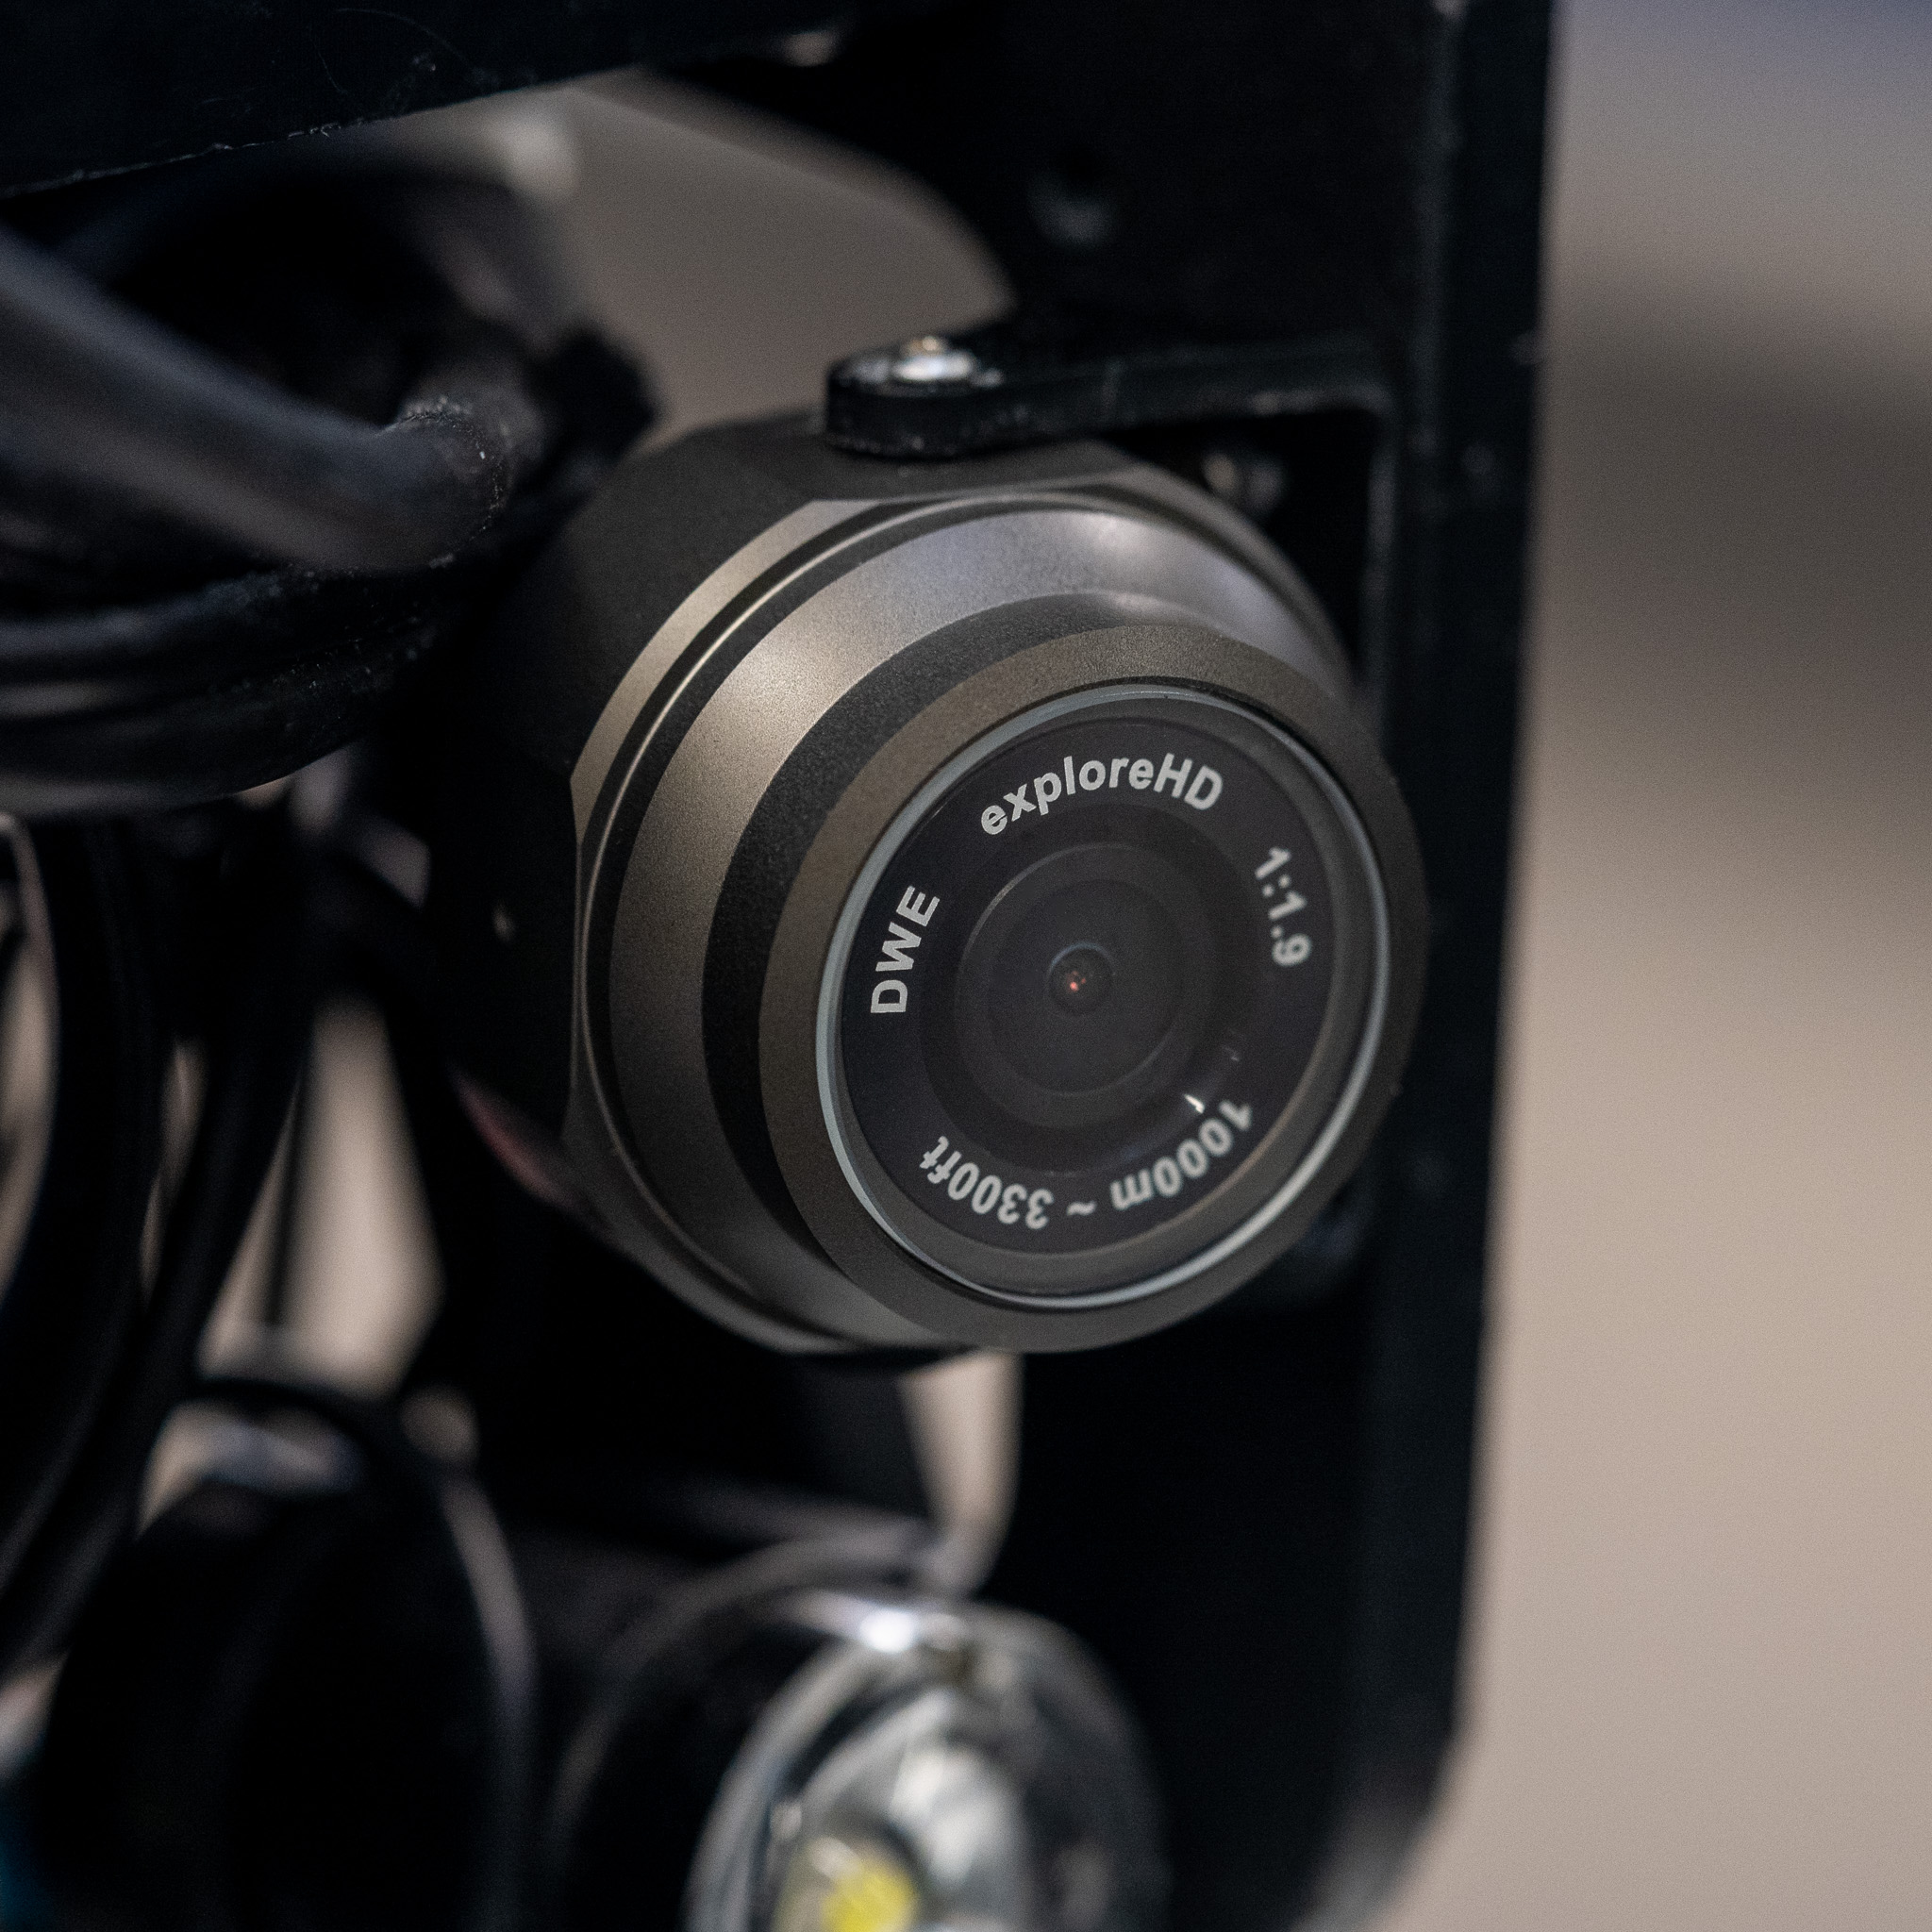
Lens Specifications
Type: Fisheye
Lens Aperture: f/2.0
View Angle: 150 Degrees Diagonal (in water)
Minimum Focus Distance: 20-30 cm
Note: Alternative Lenses Available Upon Request
Subconn MCBH8 Connector Pinout

Cable Pinout:
1: Black : Ground
2: White : NC
3: Red : +5V
4: Green : NC
5: Orange : NC
6: Blue : NC
7: White/black : DATA -
8: Red/black : DATA +
Technical Drawings#
exploreHD Heavy Housing
Image Samples#
Color remains accurate even in low light situations
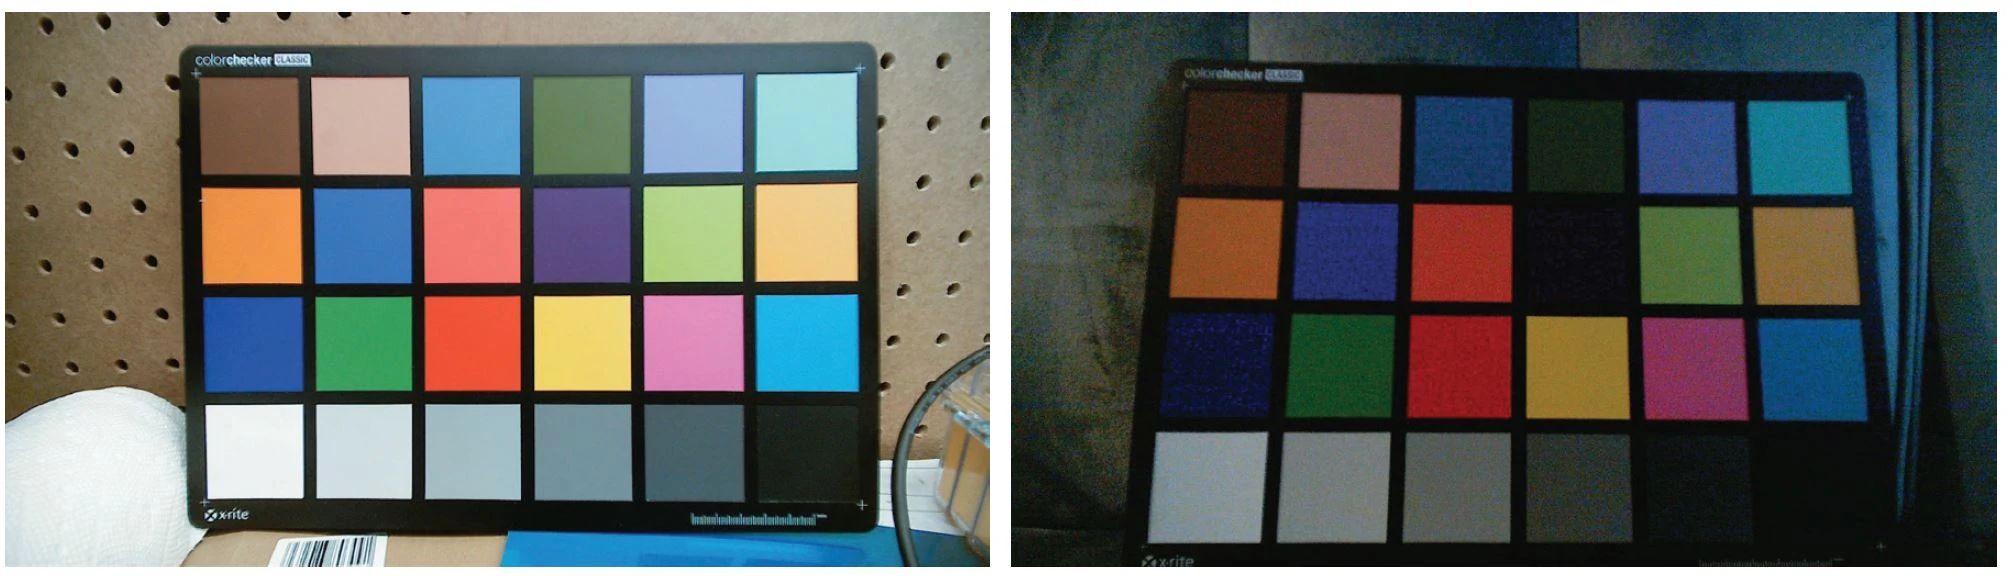
Comparison of Color Accuracy with GoPro#
The left Image is from exploreHD and the right is from a GoPro Hero
Operating Notes#
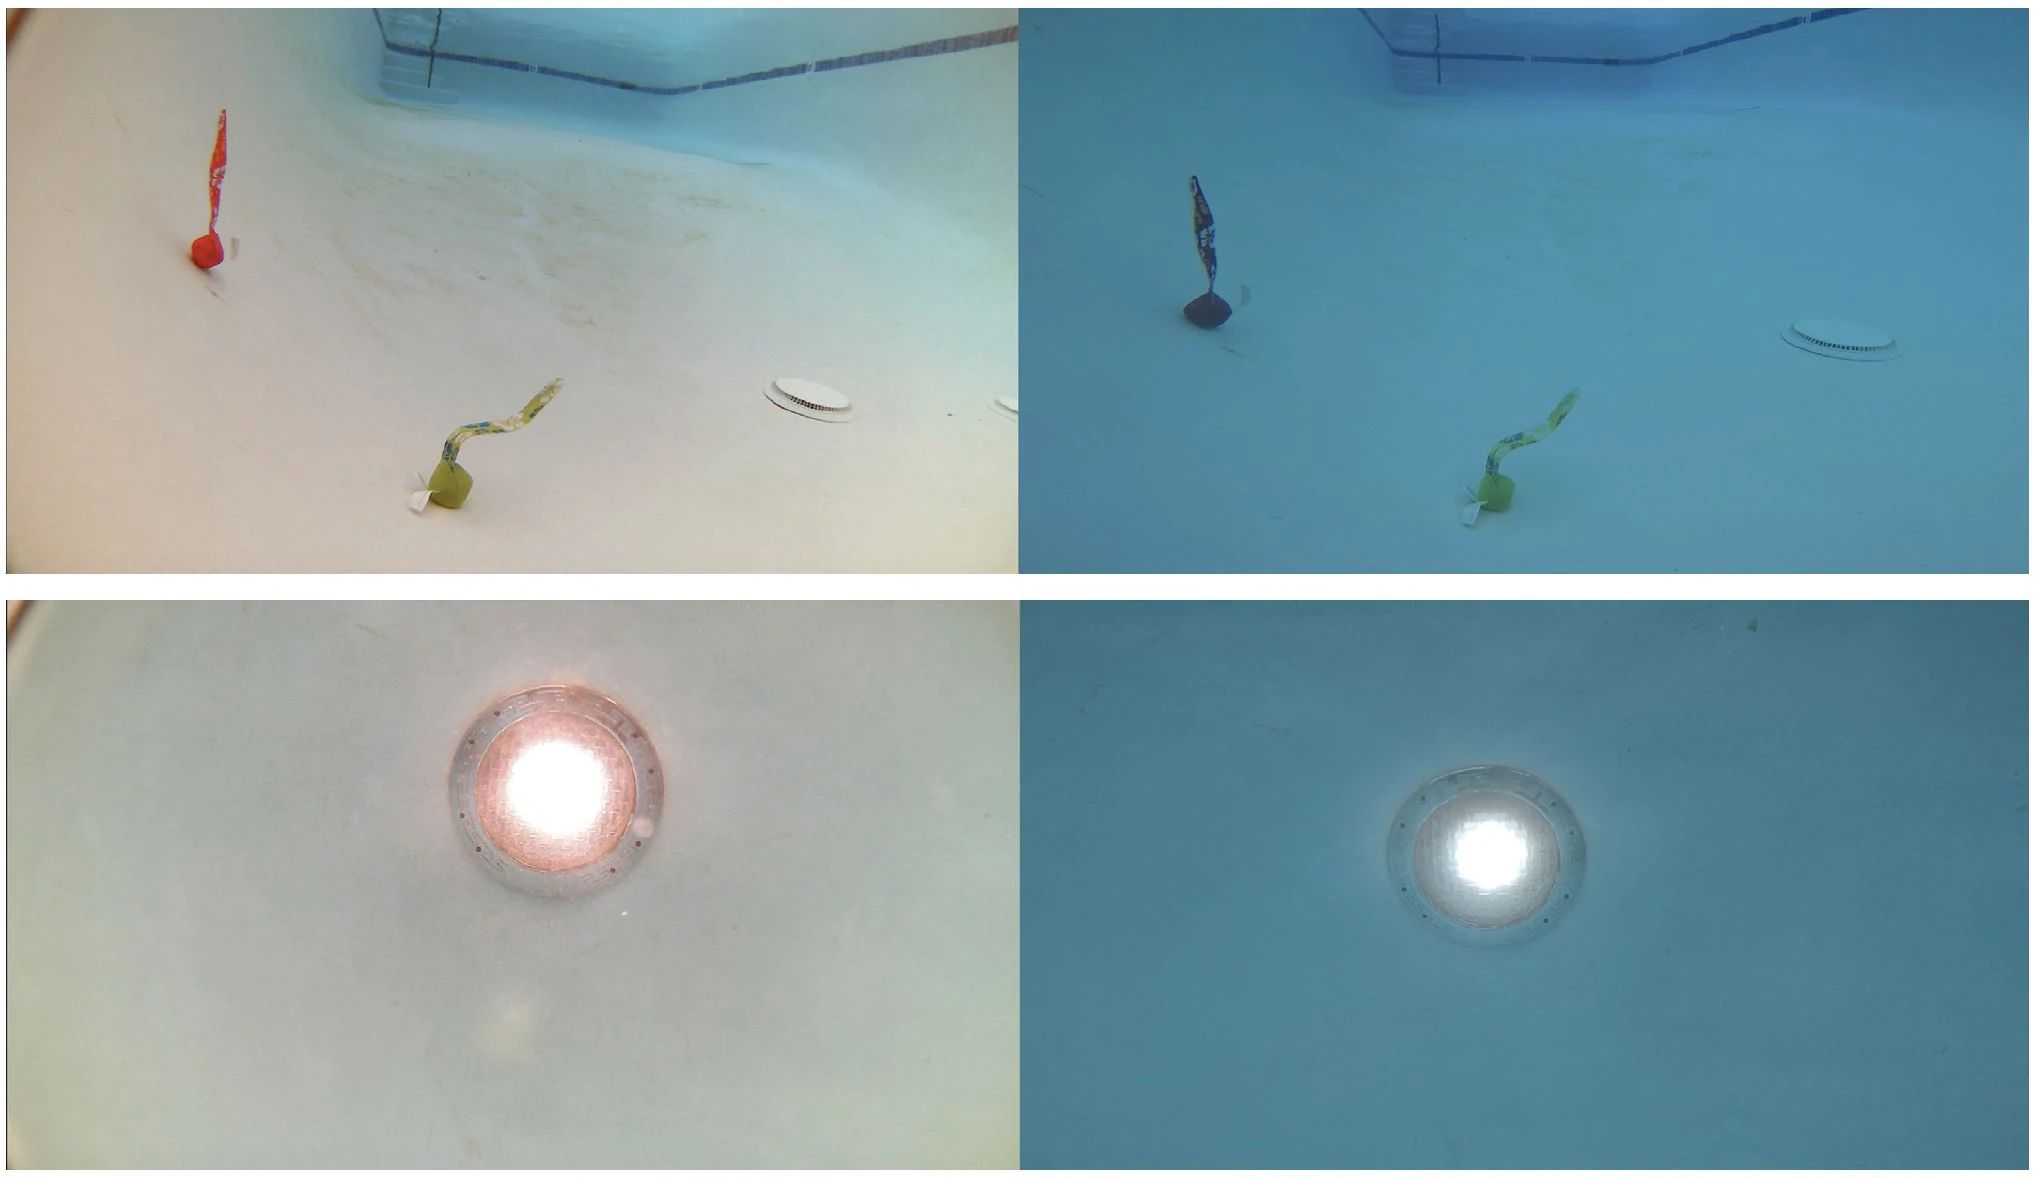
Lens Field of View in Air vs Water#
The standard lens utilizes a fisheye design, which creates a distortion effect which is more noticeable in the air than in the water due to the changes with light as it passes through different optical mediums. This has been accounted for with the selection of an optics package that provides a very wide field of view in the air so that when the lens is in the water, it can compensate for the lowered field of view. You may also notice a bit of vignetting when above water from the lens cap that will disappear once submerged.
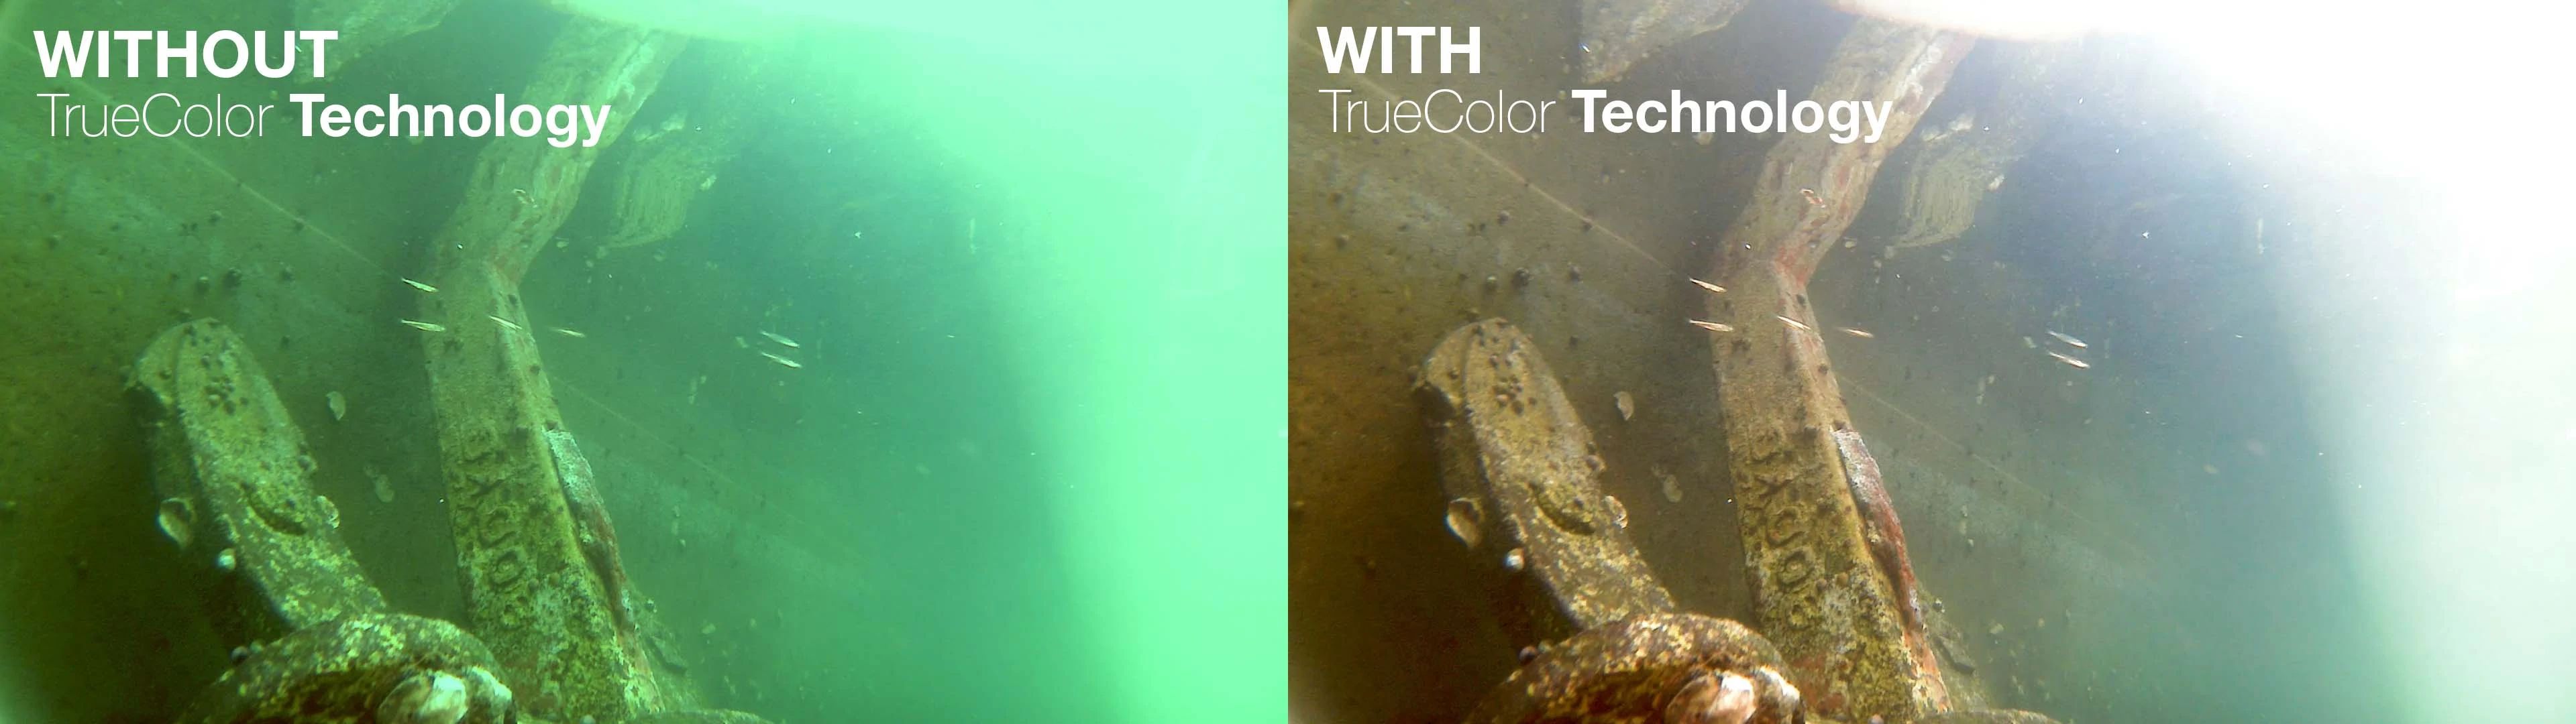
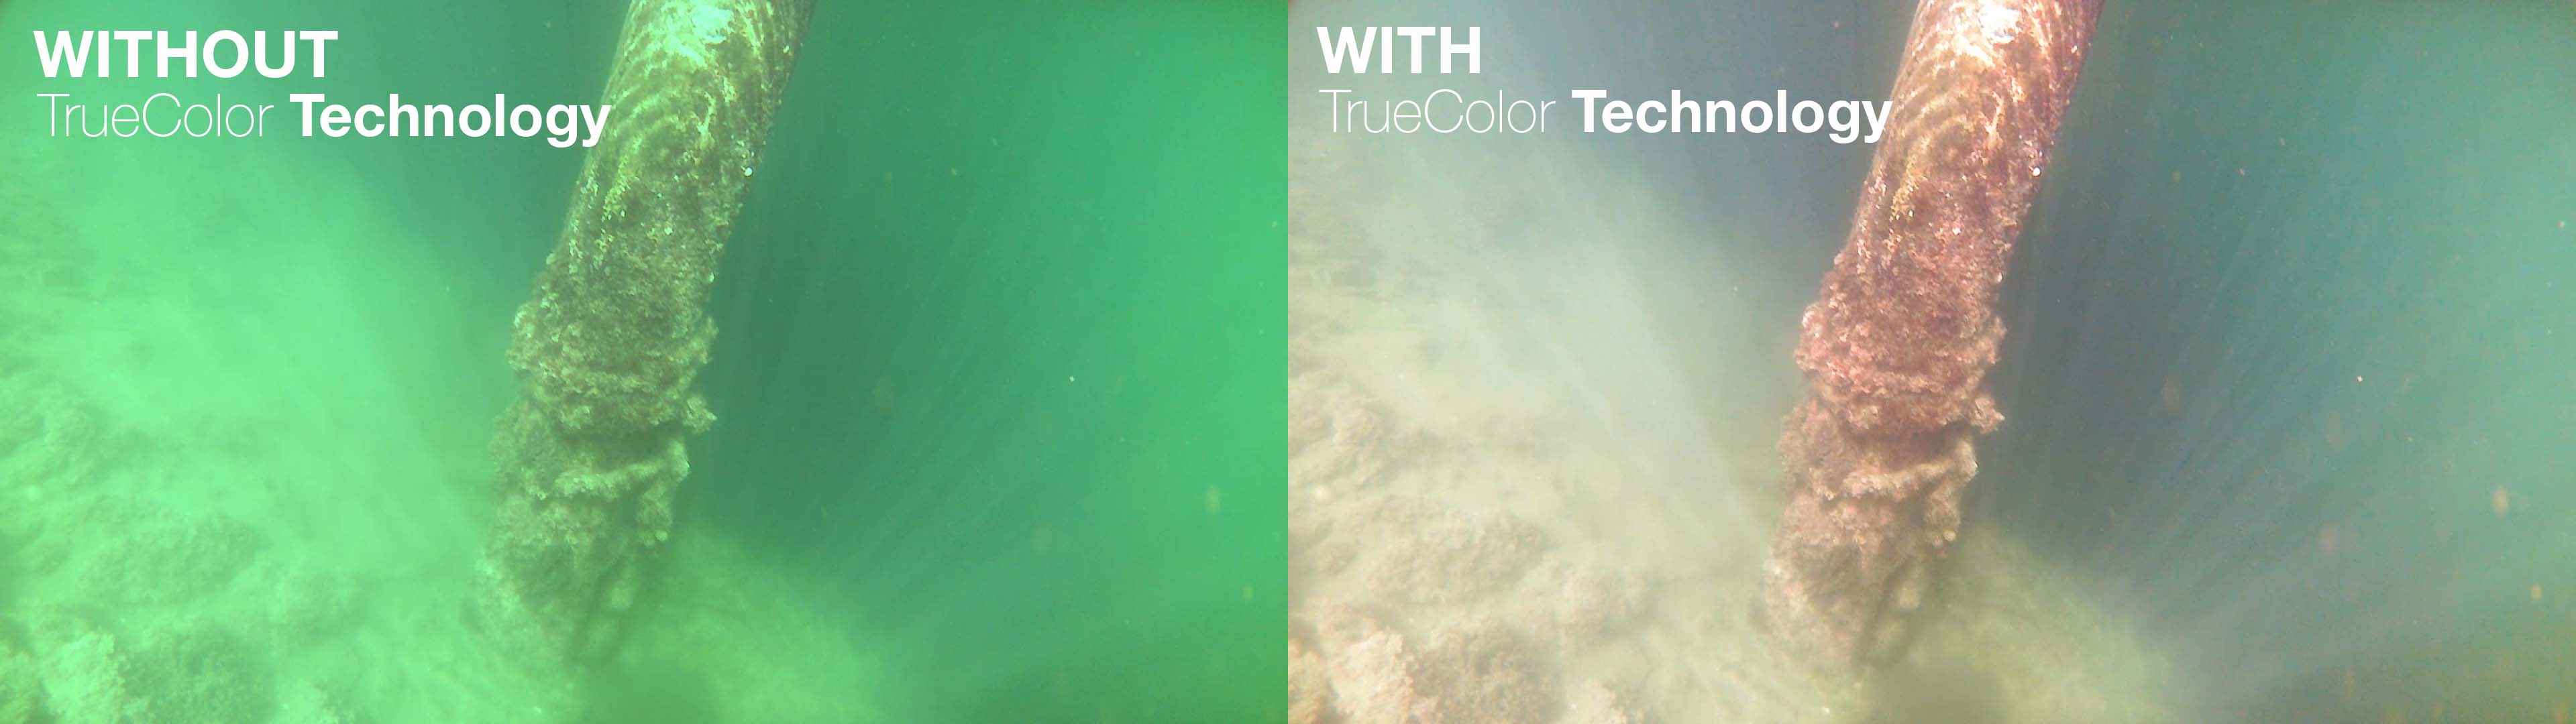
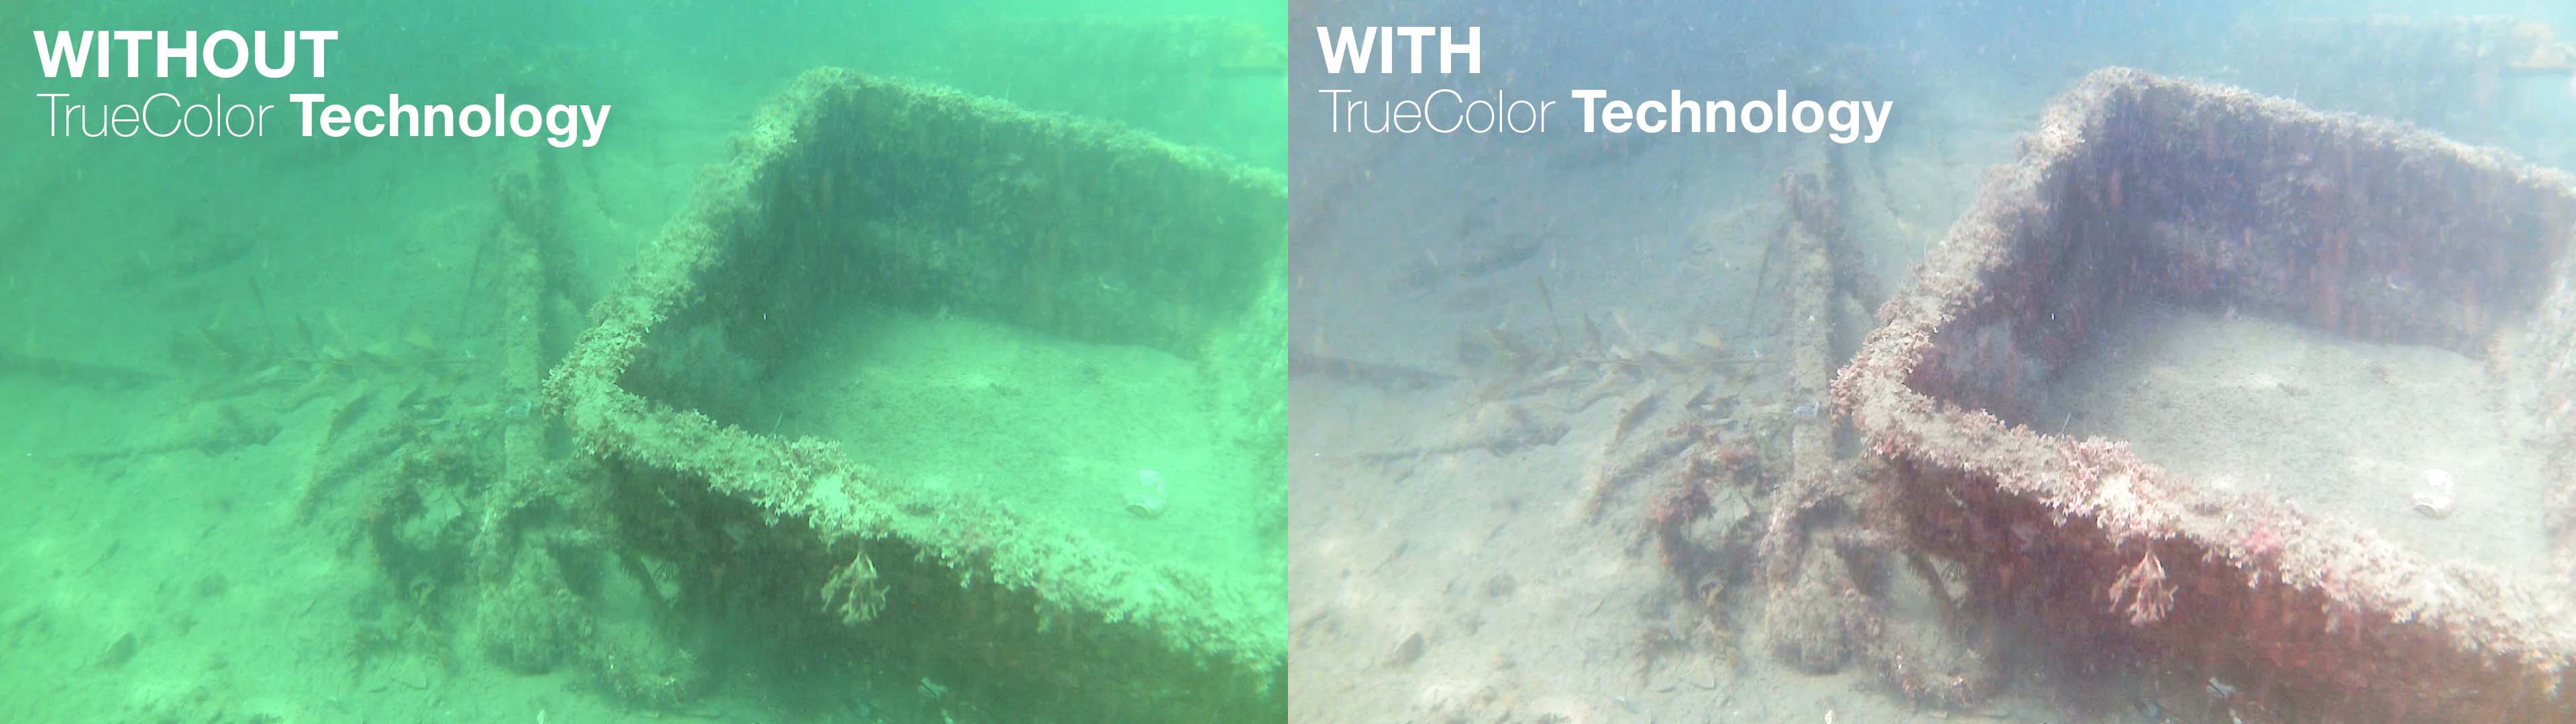
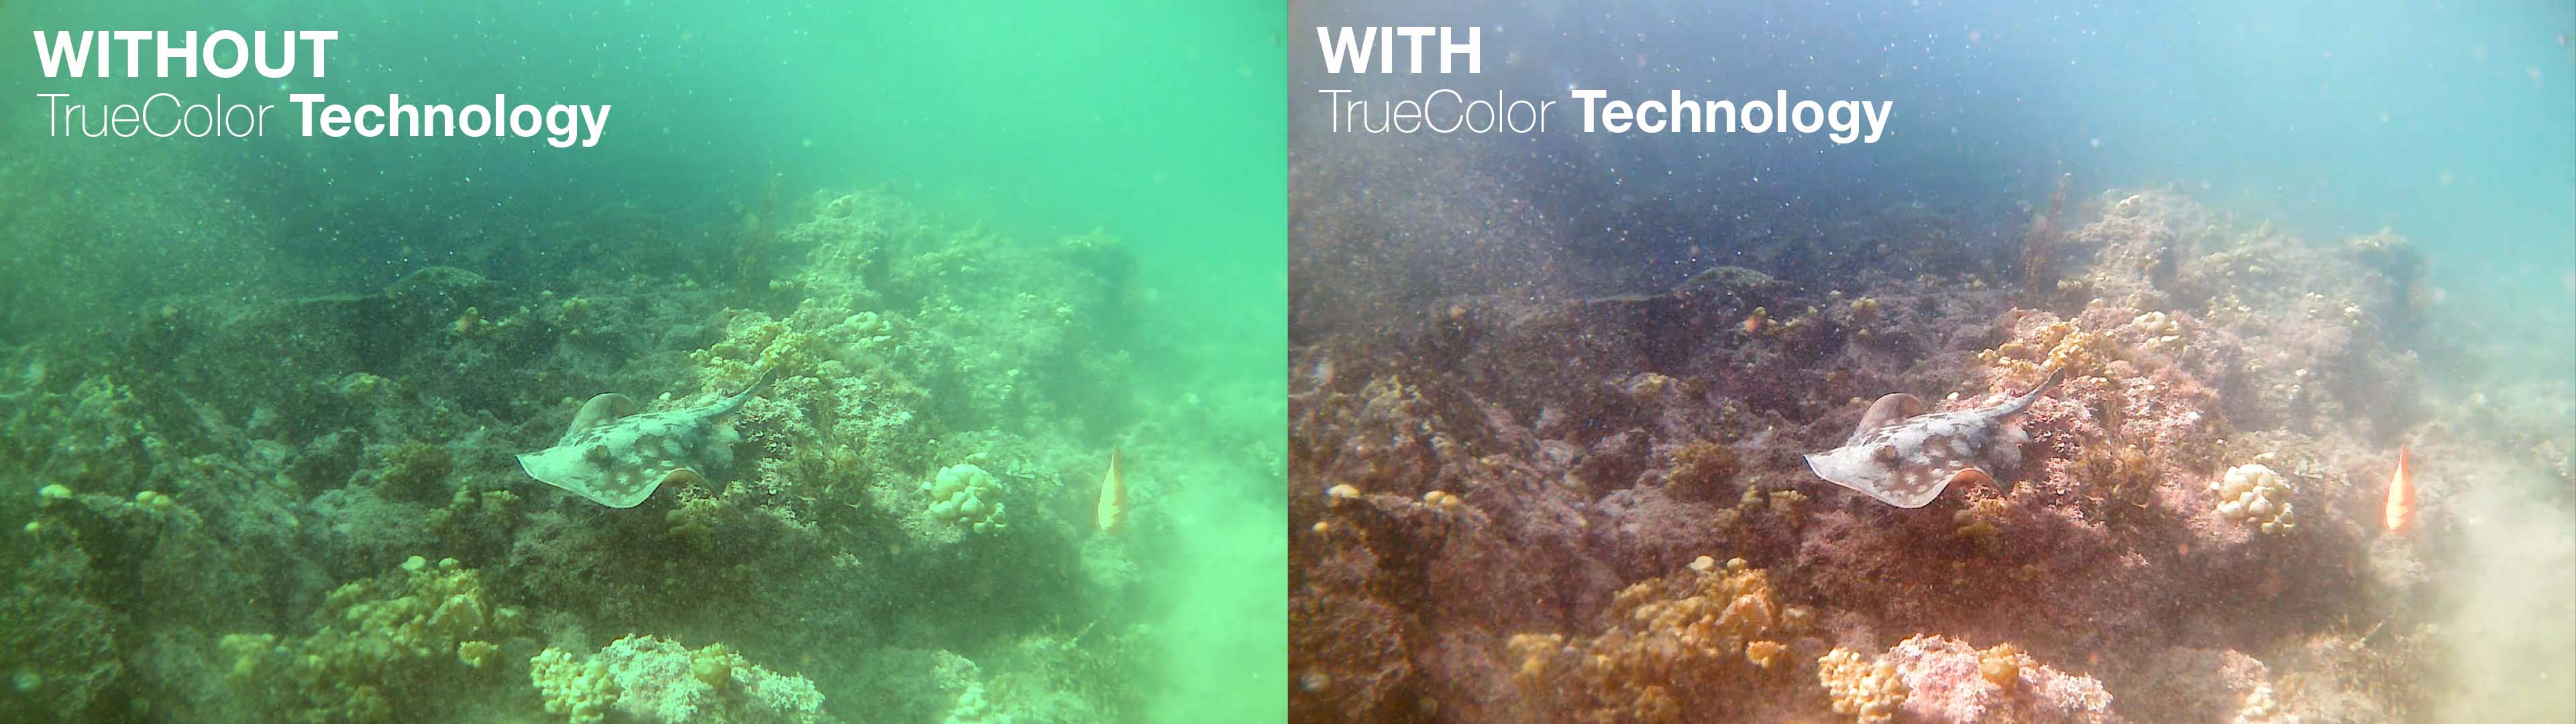
TrueColor Technology#
The camera offers TrueColor Technology which compensates for the blue/greenish tint in water using advanced AI white balance technology that we developed. However, to reduce the bluish/greenish tint, the camera has to compensate by adding more red/magenta. This means that in some images, the shadows may appear more red or magenta color. If you do not like this effect, you can turn off auto white balance in the exploreHD camera preferences.
Camera Installation#
Note
All exploreHD Heavy units will come with a WetLink Penetrator by default. Wet-mate MCBH and Dry-mate Cobalt connectors can be ordered as custom options.
Cable Penetrator:
Mount Installation
The exploreHD Heavy 2.0 has 4 flat faces along its outer perimeter. Each pair of faces is spaced 42mm apart and has an M2 threaded hole in the center of each. We recommend that you utilize mentioned holes for mounting. For simplicity, we recommend that you utilize the available exploreHD metal bracket available on our webpage. This bracket is compatible with both the exloreHD and the exploreHD Heavy.
Step 1
If you purchased the exploreHD metal bracket, prepare to assemble it by selecting the orientation of your camera + bracket assembly relative to the object that the system will be mounted to. Choose the correct pair of holes that will yield this desired orientation.
Step 2
Line up the bracket’s holes with the threaded holes on the camera body.
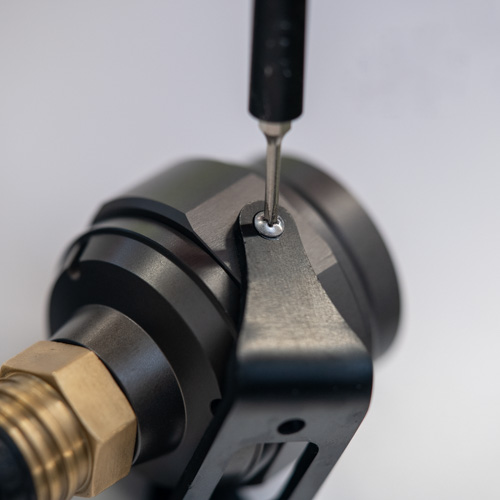
Check that the camera is rotated to the desired angle. Use a screwdriver (we recommend the iFixit Mako Driver Set) to drive the M2 screws into position. Slight bending of the bracket is normal. Blue Loctite, or some other threadlocker may be used to further secure the screws.
Cable Termination Installation
Step 1
Ensure that the camera is mounted securely on the ROV as you like it.
If installing an exploreHD Heavy with Cobalt or MCBH connector, you can skip the following steps, as there is no cable to terminate.
If utilizing an exploreHD Heavy with WetLink penetrator, you will need to follow the remaining steps.
Step 2
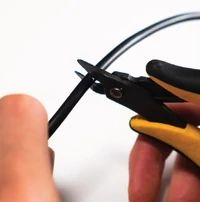
Trim the USB cable to the desired length. Ensure ample extra length remains for when the cable is in the enclosure.
Step 3
Strip the cable’s external jacket to the length that will be in the electronic enclosure.
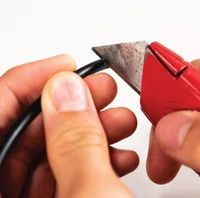
Step 4
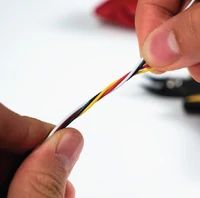
Twist the section of wires that are stripped from the black rubber insulation.
Step 5
Depending on the penetrator/connector option you have selected for your camera, follow the respective instructions to waterproof the wires.
USB Connection
Step 1
Before soldering the wires to the provided USB connector, please ensure the following tasks have been completed
Cable is properly waterproofed, following the steps in the previous page.
Cable penetrator has the o’ring in the o’ring groove.
Cable penetrator is on the outer portion of the electronic housing end cap.
The wires have been passed through the nut for the cable penetrator.
The nut is on the inner portion of the electronic housing end cap.
Step 2
Important
Ensure you are knowledgeable on the function of each wire.
Black: Ground
Red: 5V
Yellow/Green: D+ (Data Positive)
White: D- (Data Negative)
Step 3
Important
Ensure the next two wires are twisted/intertwined.
Twisted pairs ensures the data signal is strong.

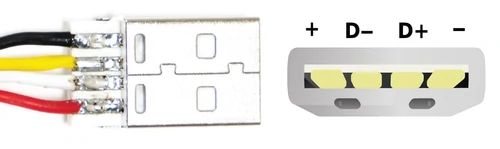
Warning
Ensure there are no solder bridges and DOUBLE CHECK to make sure the connection is correct. The camera will get damaged if the polarity is not correct.
Other Method of Installation Besides Soldering
Although not our favorite method of connecting the exploreHD, if soldering becomes a challenge for you, we suggest using a USB to terminal block instead. This method is not as recommended because it takes up a lot more space in our electronic enclosure but if space isn’t an issue, this method will work just fine.
Be extra careful to not mix up the polarity of the USB
Step 3
Connect the USB cable to a computer to confirm the camera is working and in the correct orientation.
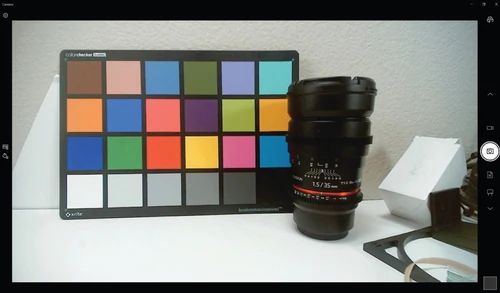
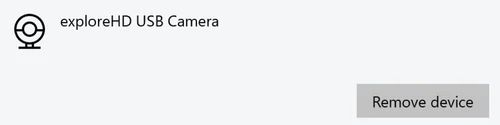
An image should be displayed using the built-in camera app on your computer. The device name should be exploreHD USB Camera
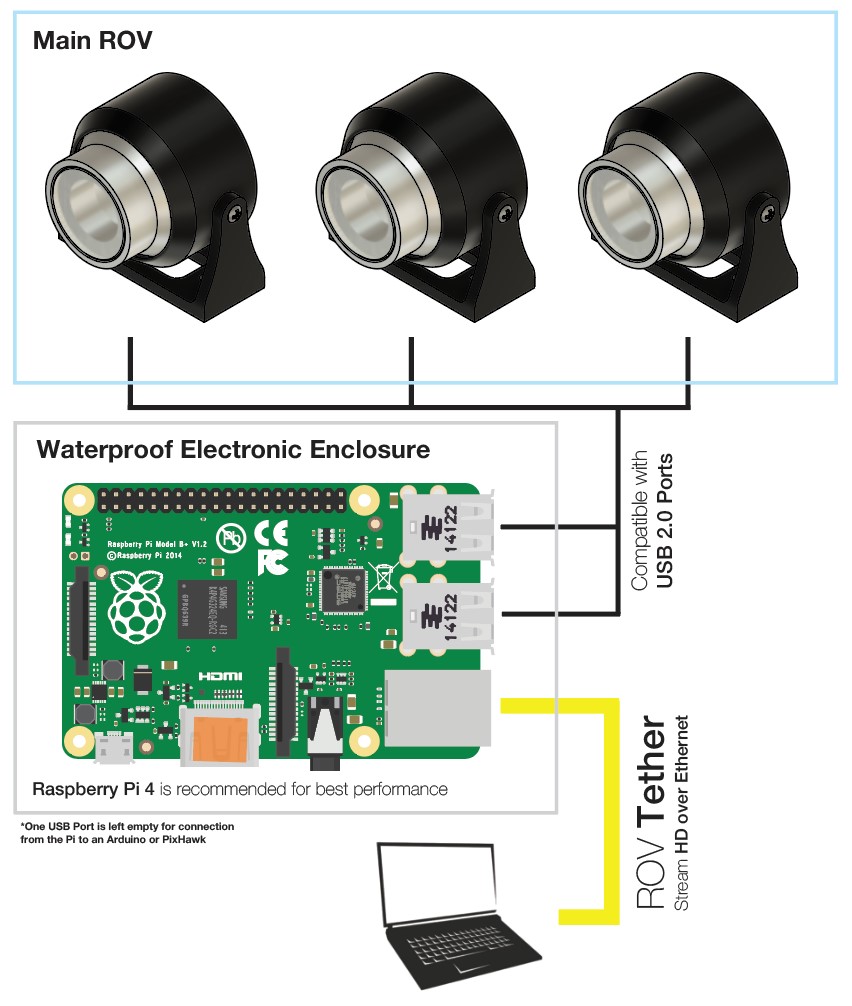
Multi-Cam ROV Connection Diagram#
Streaming#
Streaming via Raspberry Pi
If you want to run your own custom streaming setup on the Raspberry Pi, we have the perfect documentation for you!
Streaming alongside BlueOS Companion
Important
As of November 20, 2021, all exploreHD shipped will feature a new firmware that allows the cameras to be plug and play with BlueOS Companion without any extra drivers.
If your camera was shipped beforehand or you notice the video stream is sluggish, you may be running an older version.
If you want to stream multiple exploreHDs at once using BlueOS Companion, check out our BlueOS Companion Guide for installing our software alongisde BlueOS.
H.264/Bitrate Control for Streaming
To set custom H.264 parameters when streaming from a Raspberry Pi or similar computer, install DWE OS!
This software supports unlimited camera streams given you have unlimited USB ports, and installs perfectly alongside BlueOS.
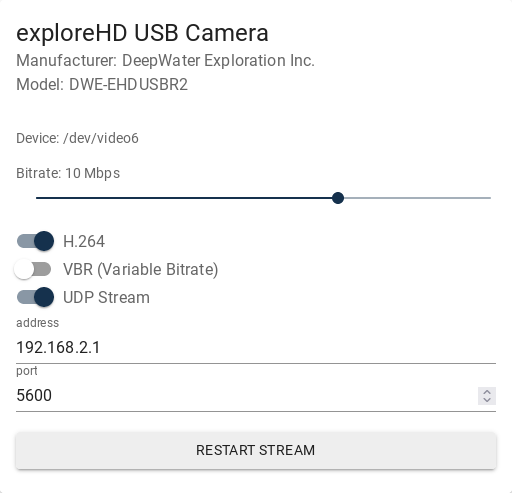
Bitrate: Adjust the bitrate of the exploreHD Camera
H.264: Toggle H.264 on or off (Off is similar to MJPEG)
VBR: Variable bitrate, changes bitrate depending on scene
UDP Stream: Starts a UDP H.264 Stream via GStreamer with port 5600.
Streaming Latency#
Streaming Method: UDP H.264 via Gstreamer
Streaming Device: Raspberry Pi 4 Model B 2GB RAM
Streamed Devices: 3 exploreHDs
Recieving Software: Open Broadcaster Software
Latency: 35ms ± 20